


Soft lights in your room at night give a soothing effect. And it feels all the better if the pendant light in your room is absolutely inexpensive and self-made. Here is a simple way to make a beautiful flower pendant light from paper pulp egg cartons within two hours. Musicians, too,use egg cartons to keep their practice sessions quiet.
The materials required to make the flower pendant light include around 80 Paper pulp egg cartons, Metal hardware cloth with 1/2-inch grid, 15-foot extension cord, One strand of 50-count miniature white Christmas lights and 50 4-inch zip ties approximately. Also keep sharp Scissors, Sidecutter wire snips and High temp hot glue gun handy. It will cost you around $30 for making this flower pendant and it can be made on special occasions like Easter.
It is pertinent enough to mention at this point that the hardware cloth leaves sharp edges when it is cut and this could be injurious. Therefore, it is advisable to work carefully and keep this project at bay from children. Another important factor is to use high-temp hot glue only since low-temp glue may not hold up with any amount of constant heat emitted from the pendant light.
Procedure:
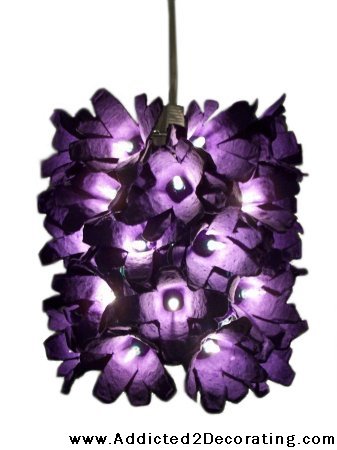
You need a total of 40 flowers for the flower pendant light. Start with cutting apart the individual cups of the egg carton with a pair of sharp scissors.
Then round off the corners, and cut a “V” between the “petals”. Once you have done this, assemble the flower using 2 cups per flower using hot glue gun. Make sure to arrange in a way so that the petals are offset.
Bend each petal back gently to open up the flower and poke a hole in the center of each flower using scissors. Keep in mind to make the hole large enough to fit over a light on the strand of Christmas lights.
The next step involves making the lamp base.
Carefully cut and roll a piece of hardware cloth (26 squares wide by 13 squares high) into a cylinder by overlapping 2 rows of squares secured using zip ties. Put the strand of Christmas lights through the top of the cylinder and poke a light through any one of the holes of the cylinder’s bottom row. Use a zip tie to secure the light in place.
Then poke another light by counting over three spaces on the bottom row. Do not forget to use zip tie for securing the light. Repeat this procedure all through the bottom row. Once, the bottom row is filled with lights, crawl up to three rows and repeat the above process.
It is essential to ensure that the lights of the second row are offset from the ones of the bottom row.The yellow spaces in the grid below mark the spaces to be filled by lights.

After filling and securing the lights in the cylinder, make certain that the plug is accessible at the top of the light. Then, plug the strand of light into the extension cord. Cut a 8 square by 8 square piece hardware cloth and form a rough circle by cutting the three corner pieces from each corner. Also, make a large hole by cutting out the four middle pieces and feed the extension cord through it.
Center the mesh circle on the top of cylinder with zip ties. Then slide one flower over each light using hot glue gun for securing them. Plug in the light and enjoy after attaching flowers on the entire cylinder.